Designed by JQ3C273!
1288 字
6 分钟
Android学习笔记——Intent的基本使用
1.了解Intent的使用
1-1.查阅资料,理解什么是Intent?
在Android编程中,Intent(意图)是一种在组件之间传递消息的对象,用于请求操作或传递数据。Intent主要用于启动组件(如Activity、Service、BroadcastReceiver)之间的交互。
1-2.Intent的分类并详细描述不同分类的特点。
显式Intent(Explicit Intent):
明确定义了要启动的组件的类名。这种Intent主要用于在应用内部的组件之间进行通信。
Intent explicitIntent = new Intent(this, TargetActivity.class);
startActivity(explicitIntent);
隐式Intent(Implicit Intent):
没有明确定义要启动的组件,而是指定了操作,系统根据这个操作找到合适的组件。这种Intent主要用于在不同应用之间进行通信。
Intent implicitIntent = new Intent("com.example.ACTION");
startActivity(implicitIntent);
Intent的属性及属性实现的功能
Action(动作):
描述要执行的操作,如ACTION_VIEW、ACTION_EDIT等。
Data(数据):
指定操作的数据,可以是URI、MIME类型等。
Category(类别):
指定与组件关联的附加信息,如CATEGORY_LAUNCHER等。
Type(类型):
指定数据的类型,通常与数据一起使用。
1-4.页面跳转中数据传递属于哪一个属性?
数据传递通常是通过Intent的附加信息来实现的,主要使用putExtra方法。这属于Intent的Extra(额外信息) 属性。
Intent intent = new Intent(this, TargetActivity.class);
intent.putExtra("key", "value");
startActivity(intent);
在目标Activity中可以通过以下方式获取传递的数据:
String data = getIntent().getStringExtra("key");
2.搭建“饭店点餐”场景的Android界面
2-1.完成界面搭建
自行选择场景进行3个Android页面设计和3个类的设计与搭建。
2-2.实现第一第二页的功能
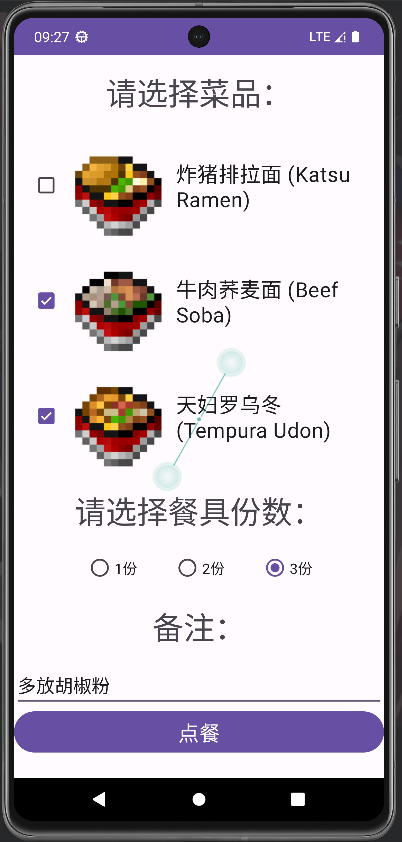
第一个页面要实现数据的输入、单项或多项的选择及按钮的跳转与数据的传递(传递给第二个页面)。
layout_intentdemo1.xml
<?xml version="1.0" encoding="utf-8"?>
<LinearLayout xmlns:android="http://schemas.android.com/apk/res/android"
    android:layout_width="match_parent"
    android:layout_height="match_parent"
    android:orientation="vertical"
    >
    <androidx.appcompat.widget.LinearLayoutCompat
        android:layout_width="match_parent"
        android:layout_height="wrap_content"
        android:orientation="vertical">
        <TextView
            android:layout_width="match_parent"
            android:layout_height="wrap_content"
            android:text="请选择菜品:"
            android:textSize="30sp"
            android:gravity="center_horizontal"
            android:layout_margin="15dp"
            />
        <CheckBox
            android:id="@+id/cb_intent_food1"
            android:layout_width="wrap_content"
            android:layout_height="wrap_content"
            android:text="炸猪排拉面 (Katsu Ramen)"
            android:drawableLeft="@drawable/noodle1"
            android:layout_marginHorizontal="20dp"
            android:textSize="20sp"
            />

        <CheckBox
            android:id="@+id/cb_intent_food2"
            android:layout_width="wrap_content"
            android:layout_height="wrap_content"
            android:text="牛肉荞麦面 (Beef Soba)"
            android:drawableLeft="@drawable/noodle2"
            android:layout_marginHorizontal="20dp"
            android:textSize="20sp"
            />

        <CheckBox
            android:id="@+id/cb_intent_food3"
            android:layout_width="wrap_content"
            android:layout_height="wrap_content"
            android:text="天妇罗乌冬 (Tempura Udon)"
            android:drawableLeft="@drawable/noodle3"
            android:layout_marginHorizontal="20dp"
            android:textSize="20sp"/>
    </androidx.appcompat.widget.LinearLayoutCompat>
    <androidx.appcompat.widget.LinearLayoutCompat
        android:layout_width="match_parent"
        android:layout_height="wrap_content"
        android:orientation="vertical">
    <TextView
        android:layout_width="match_parent"
        android:layout_height="wrap_content"
        android:text="请选择餐具份数:"
        android:textSize="30sp"
        android:gravity="center_horizontal"
        android:layout_margin="15dp"
        />
        <RadioGroup
            android:id="@+id/rg_intent_dash"
            android:layout_width="wrap_content"
            android:layout_height="wrap_content"
            android:orientation="horizontal"
            android:layout_gravity="center_horizontal">

            <RadioButton
                android:id="@+id/radioButton1"
                android:layout_width="wrap_content"
                android:layout_height="wrap_content"
                android:text="1份"
                android:layout_marginHorizontal="20dp"/>

            <RadioButton
                android:id="@+id/radioButton2"
                android:layout_width="wrap_content"
                android:layout_height="wrap_content"
                android:text="2份"
                android:layout_marginHorizontal="20dp"/>

            <RadioButton
                android:id="@+id/radioButton3"
                android:layout_width="wrap_content"
                android:layout_height="wrap_content"
                android:text="3份"
                android:layout_marginHorizontal="20dp"/>
        </RadioGroup>
        <TextView
            android:layout_width="match_parent"
            android:layout_height="wrap_content"
            android:text="备注:"
            android:textSize="30sp"
            android:gravity="center_horizontal"
            android:layout_margin="15dp"
            />
        <EditText
            android:id="@+id/et_intent_bz"
            android:layout_width="match_parent"
            android:layout_height="wrap_content"
            android:text=""
            />
        <Button
            android:id="@+id/btn_intent_confirm"
            android:layout_width="match_parent"
            android:layout_height="wrap_content"
            android:text="点餐"
            android:textSize="20sp"
            />
    </androidx.appcompat.widget.LinearLayoutCompat>
</LinearLayout>
IntentDemo1Activity.java
package com.yt.class3;

import android.content.Intent;
import android.os.Bundle;
import android.view.View;
import android.widget.Button;
import android.widget.CheckBox;
import android.widget.EditText;
import android.widget.RadioButton;
import android.widget.RadioGroup;

import androidx.annotation.Nullable;
import androidx.appcompat.app.AppCompatActivity;

import java.util.ArrayList;
import java.util.List;

public class IntentDemo1Activity extends AppCompatActivity {
    private RadioGroup radioGroup;
    private CheckBox cbFood1, cbFood2, cbFood3;
    private EditText editTextNote;
    private Button buttonConfirm;
    @Override
    protected void onCreate(@Nullable Bundle savedInstanceState) {
        super.onCreate(savedInstanceState);
        setContentView(R.layout.layout_intentdemo1);
        radioGroup = findViewById(R.id.rg_intent_dash);
        cbFood1 = findViewById(R.id.cb_intent_food1);
        cbFood2 = findViewById(R.id.cb_intent_food2);
        cbFood3 = findViewById(R.id.cb_intent_food3);
        editTextNote = findViewById(R.id.et_intent_bz);
        buttonConfirm = findViewById(R.id.btn_intent_confirm);
        buttonConfirm.setOnClickListener(new View.OnClickListener() {
                @Override
            public void onClick(View view) {
                int dash = radioGroup.getCheckedRadioButtonId();
                RadioButton selectDash =findViewById(dash);
                String dashNumber = selectDash.getText().toString();
                List<String> selectFood = new ArrayList<>();
                if (cbFood1.isChecked()){
                    selectFood.add(cbFood1.getText().toString());
                }
                if (cbFood2.isChecked()){
                    selectFood.add(cbFood2.getText().toString());
                }
                if (cbFood3.isChecked()){
                    selectFood.add(cbFood3.getText().toString());
                }
                String note = editTextNote.getText().toString();
                Intent intent = new Intent(IntentDemo1Activity.this, IntentDemo2Activity.class);
                // 传递选择的餐具份数、选择的菜品和备注信息
                intent.putExtra("dashNumber", dashNumber);
                intent.putStringArrayListExtra("foods", new ArrayList<>(selectFood));
                intent.putExtra("note", note);
                startActivity(intent);
            }
        });
    }
}
layout_intentdemo2.xml
<?xml version="1.0" encoding="utf-8"?>
<LinearLayout xmlns:android="http://schemas.android.com/apk/res/android"
    android:layout_width="match_parent"
    android:layout_height="match_parent"
    android:orientation="vertical">
    <LinearLayout
        android:layout_width="match_parent"
        android:layout_height="wrap_content"
        android:orientation="vertical">
        <TextView
            android:layout_width="match_parent"
            android:layout_height="wrap_content"
            android:text="订单信息:"
            android:textSize="20dp"
            />
        <TextView
            android:id="@+id/tv_intent2_order"
            android:layout_width="match_parent"
            android:layout_height="wrap_content"
            />
    </LinearLayout>
    <LinearLayout
        android:layout_width="match_parent"
        android:layout_height="wrap_content"
        android:orientation="horizontal"
        android:gravity="center_horizontal">
        <Button
            android:id="@+id/btn_intent2_call"
            android:layout_width="wrap_content"
            android:layout_height="wrap_content"
            android:drawableLeft="@drawable/ic_phone"
            android:text="联系商家"
            android:layout_margin="20dp"
            />
        <Button
            android:id="@+id/btn_intent2_mess"
            android:layout_width="wrap_content"
            android:layout_height="wrap_content"
            android:drawableLeft="@drawable/ic_message"
            android:text="联系客服"
            android:layout_margin="20dp"
            />
    </LinearLayout>
    <Button
        android:id="@+id/btn_intent2_next"
        android:layout_width="wrap_content"
        android:layout_height="wrap_content"
        android:text="下一页"
        android:layout_margin="10dp"
        android:layout_gravity="center_horizontal"/>
</LinearLayout>
IntentDemo2Activity.java
package com.yt.class3;

import android.content.Intent;
import android.net.Uri;
import android.os.Bundle;
import android.view.View;
import android.widget.Button;
import android.widget.TextView;

import androidx.annotation.Nullable;
import androidx.appcompat.app.AppCompatActivity;

import java.util.ArrayList;

public class IntentDemo2Activity extends AppCompatActivity {
    TextView tvOrder;
    Button btnCall,btnMess,btnNext;
    @Override
    protected void onCreate(@Nullable Bundle savedInstanceState) {
        super.onCreate(savedInstanceState);
        setContentView(R.layout.layout_intentdemo2);
        tvOrder = findViewById(R.id.tv_intent2_order);
        btnCall = findViewById(R.id.btn_intent2_call);
        btnMess = findViewById(R.id.btn_intent2_mess);
        btnNext = findViewById(R.id.btn_intent2_next);
        btnNext.setOnClickListener(new View.OnClickListener() {
            @Override
            public void onClick(View view) {
                Intent nextPage = new Intent(IntentDemo2Activity.this, IntentDemo3Activity.class);
                startActivity(nextPage);
            }
        });
        btnCall.setOnClickListener(new View.OnClickListener() {
            @Override
            public void onClick(View view) {
                Uri uri = Uri.parse("tel:10086");
                Intent intent = new Intent(Intent.ACTION_VIEW,uri);
                startActivity(intent);
            }
        });
        btnMess.setOnClickListener(new View.OnClickListener() {
            @Override
            public void onClick(View view) {
                Uri uri = Uri.parse("smsto:10086");
                Intent intent = new Intent(Intent.ACTION_VIEW,uri);
                startActivity(intent);
            }
        });
        // 获取从第一个页面传递的数据
        Intent intent = getIntent();
        String dashNumber = intent.getStringExtra("dashNumber");
        ArrayList<String> foods = intent.getStringArrayListExtra("foods");
        String note = intent.getStringExtra("note");

        // 构建显示的文本
        StringBuilder selectionText = new StringBuilder( "\n菜品: ");
        for (String menuItem : foods) {
            selectionText.append(menuItem).append(", ");
        }
        selectionText.append("\n餐具份数:").append(dashNumber);
        selectionText.append("\n备注: ").append(note);

        // 设置显示的文本
        tvOrder.setText(selectionText.toString());
    }
}
2-3. 完善第三页的功能
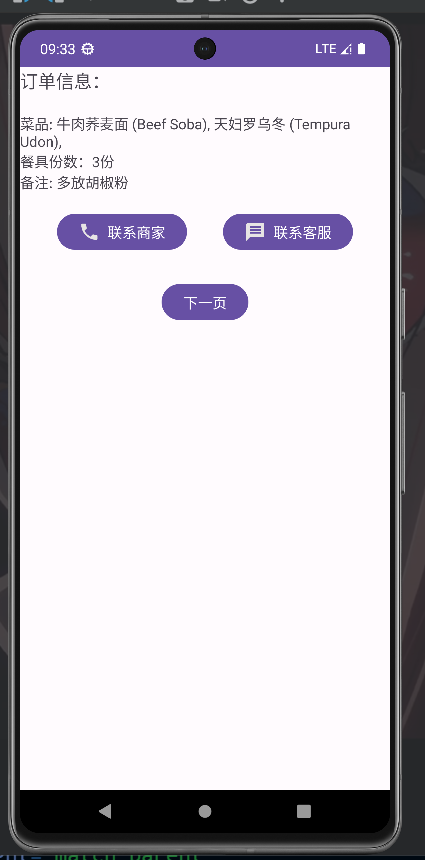
第二个页面可以接收第一个页面传递的所有数据并显示,可以切换到打电话面板和发短信面板及跳转按钮(跳转到第三个页面)。
layout_intentdemo3.xml
<?xml version="1.0" encoding="utf-8"?>
<LinearLayout xmlns:android="http://schemas.android.com/apk/res/android"
    android:layout_width="match_parent"
    android:layout_height="match_parent">
    <LinearLayout
        android:layout_width="match_parent"
        android:layout_height="match_parent"
        android:orientation="vertical"
        android:layout_marginTop="20dp">
        <TextView
            android:id="@+id/tv_intent3_url"
            android:layout_width="match_parent"
            android:layout_height="wrap_content"
            android:text="官网: http://ytmc.fun:55555/"
            android:autoLink="web"
            android:textSize="20sp"
            />
        <Button
            android:id="@+id/btn_intent_location"
            android:layout_width="wrap_content"
            android:layout_height="wrap_content"
            android:text="到这去"
            android:drawableLeft="@drawable/ic_location"
            android:layout_margin="10dp"
            android:layout_gravity="center_horizontal"/>
    </LinearLayout>
</LinearLayout>
IntentDemo3Activity.java
package com.yt.class3;

import android.content.Intent;
import android.net.Uri;
import android.os.Bundle;
import android.view.View;
import android.widget.Button;

import androidx.annotation.Nullable;
import androidx.appcompat.app.AppCompatActivity;

public class IntentDemo3Activity extends AppCompatActivity {
    Button btnLocation;
    @Override
    protected void onCreate(@Nullable Bundle savedInstanceState) {
        super.onCreate(savedInstanceState);
        setContentView(R.layout.layout_intentdemo3);
        btnLocation = findViewById(R.id.btn_intent_location);
        btnLocation.setOnClickListener(new View.OnClickListener() {
            @Override
            public void onClick(View view) {
                double latitude = 36.668175; // 举例:纬度
                double longitude = 119.180296; // 举例:经度
                Uri geoUri = Uri.parse("geo:" + latitude + "," + longitude);
                Intent mapIntent = new Intent(Intent.ACTION_VIEW, geoUri);
                startActivity(mapIntent);
            }
        });
    }
}
2-4.实现网址打开
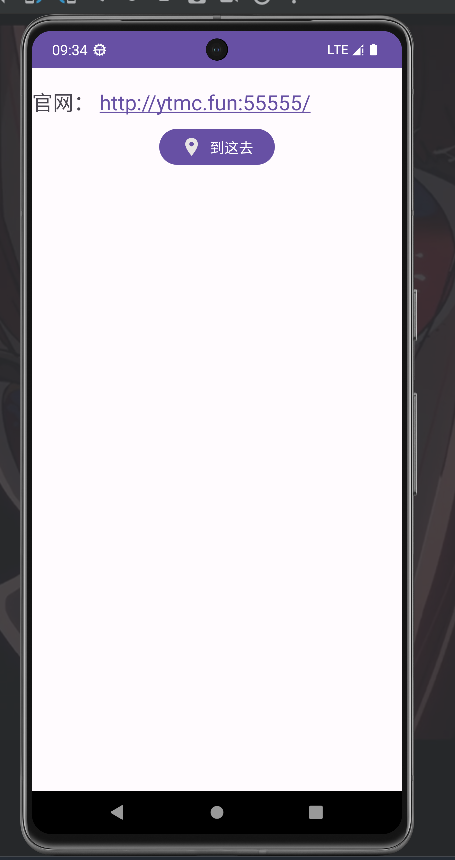
第三个页面可以点击链接文字链接到http://ytmc.fun:55555/上去。 可以使用Intent,这里采用改textView 属性android:autoLink="web"的方法。
2-5.实现地图显示
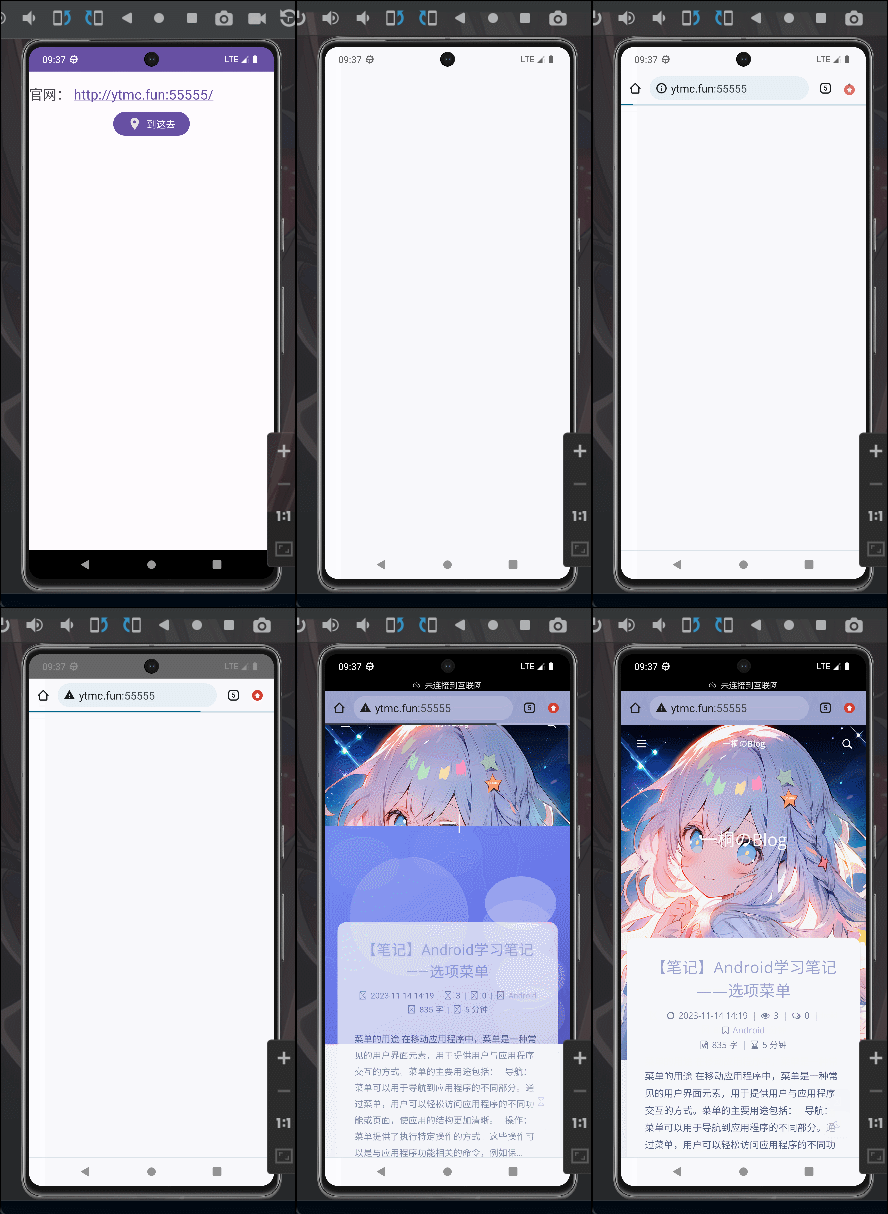
根据经纬度在地图上显示
double latitude = xxx; // 纬度
double longitude = xxx; // 经度
Uri geoUri = Uri.parse("geo:" + latitude + "," + longitude);
Intent mapIntent = new Intent(Intent.ACTION_VIEW, geoUri);
startActivity(mapIntent);
Android学习笔记——Intent的基本使用
https://blog.ytmc.fun/posts/android学习笔记intent的基本使用